

/ICX_Insights%20content/Folder%20icon%20for%20insights.svg)
/ICX_Insights%20content/Folder%20celeste.svg)
/ICX_Insights%20content/Print%20gris.svg)
/ICX_Insights%20content/Print%20celeste.svg)
/ICX_Insights%20content/Share%20icon.svg)
/ICX_Insights%20content/Share%20celeste.svg)
/ICX_Insights%20content/Subscribe%20icon.svg)
/ICX_Insights%20content/Subscribe%20celeste.svg)
/ICX_Insights%20content/Start%20Here%20icon.svg)
/ICX_Insights%20content/Start%20here%20celeste.svg)
Magento B2B and the functional differences with Magento B2C
Let's find out how B2B platforms are becoming more important every day and also let's understand what are these platforms used for and how do they...
3 min read
3 min read
Webservices are vital mechanisms for two or more systems to communicate, since they allow information to be transferred, procedures to be executed or user data to be captured.
Integrating external systems with an eCommerce platform requires reliable and scalable communication channels. In this regard, Magento 2 stands out by offering solid support for web services through REST and SOAP APIs, allowing developers to connect third-party applications and facilitate data exchange. Creating a custom web service in Magento 2 allows you to extend the platform's native functionality and tailor it to specific business needs.
Whether it's syncing inventory with an ERP, sending orders to a CRM or connecting a mobile app, Magento's service-oriented architecture makes it easy to develop integrations. By creating custom endpoints, developers can securely expose certain data or processes, ensuring efficient communication without compromising store performance or security.
This article explains how to create a custom web service in Magento 2, detailing the structure, key steps and best practices for implementing an API effectively. Leveraging these Magento capabilities allows you to increase automation, reduce manual tasks and improve operational efficiency.Imagine that you fill out a form with your personal data, then these are sent to a server and processed, it can be to participate in a raffle, to request a particular service or make a claim. This article will cover a simple guide to create a webservice in Magento 2, which will be used as an example to capture the data of a customer who is filling out a contact form.
First, the form must be created for the client side, for this we are going to use the tool to create an HTML form quickly and easily:

You must copy the HTML code of the form and paste it where you want to show it to the user. For this exercise, a "contact" page will be created: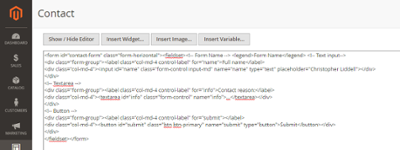
Additionally, the following javascript code will be used to submit the form when the user presses the Submit button (we invite you to add more functionality such as validations or a captcha, since this example is just a basic demo):<script type="text/javascript" defer> require(['jquery','jquery/ui'], function($) { $('#submit').on('click', function(){ var formData = new FormData($("#contact-form")[0]); formData = JSON.stringify(Object.fromEntries(formData)); $('body').trigger('processStart'); $.ajax({ type: "POST",
url: "/rest/V1/custom/contact-form/", data: formData, success: function(){ $('body').trigger('processStop'); alert("Success"); }, error: function (xhr, ajaxOptions, thrownError) { $('body').trigger('processStop'); alert("Error"); }, dataType: 'json', contentType: 'application/json', }); });});</script>
From the previous javascript code, you must replace "contact-form" with the name that you want to give to the route of your webservice. With this we finish our form, now we are going to create the API and the execution of the server side.
In the folder, app/code of our Magento directory, we are going to create a module, in this example it will be named "Imagineer_Contact" (create the folder app/code/Imagineer/Contact).
Inside our module we will add the following files (replace "Imagineer" and "Contact" to match the name of your module):
registration.php :
<?php\Magento\Framework\Component\ComponentRegistrar::register( \Magento\Framework\Component\ComponentRegistrar::MODULE, 'Imagineer_Contact', __DIR__);etc/module.xml:
<?xml version="1.0"?><config xmlns:xsi="http://www.w3.org/2001/XMLSchema-instance" xsi:noNamespaceSchemaLocation="urn:magento:framework:Module/etc/module.xsd"> <module name="Imagineer_Contact" setup_version="1.0.0" /></config>Api/Contact.php (Here the parameters that the webservice receives must be indicated, in this case there are only 2, the name and the contact information, both are strings and their names must match the names of the HTML form fields):
<?php namespace Imagineer\Contact\Api;interface Contact{ /** * GET for Post api * @param string $name * @param string $info * @return string */ public function getPost($name, $info);}
Model/Api/Contact.php (Here we are going to add the functionality of our getPost method, we must keep the same parameters and names as in the API that was defined in the previous interface):
<?php namespace Imagineer\Contact\Model\Api; use Psr\Log\LoggerInterface; class Contact{ protected $logger; public function __construct( LoggerInterface $logger ) { $this->logger = $logger; } /** * @inheritdoc */ public function getPost($name, $info); { $response = ['success' => false]; try { // Your Code here $response = ['success' => true, 'message' => $name . " " . $info]; } catch (\Exception $e) { $response = ['success' => false, 'message' => $e->getMessage()]; $this->logger->info($e->getMessage()); } return json_encode($response); }}
Inside the getPost function, you can add the desired behavior, such as saving the information to a database, sending an email, or whatever you want to do. In any case, we always recommend that you do both client-side and server-side security validations, to avoid code injection attacks or simply clean up invalid data formats.
Once we have these files ready in our module, we only need to install and compile our Magento2 instance, to do this run the following commands:
bin/magento setup:upgrade
bin/magento setup:di:compile
bin/magento cache:flush
Now try entering the data in the form, I recommend opening the inspection console of your browser (in the case of Chrome, pressing F12 or right click > inspect). Then navigate to the Network tab and check what happens when you Submit the form.
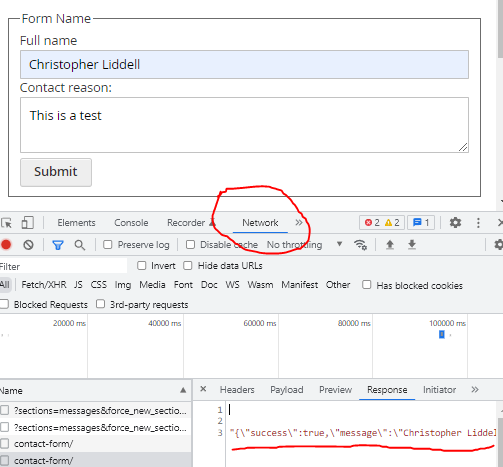
You should see a 200 code with the response message. If the error code is 400, check the syntax of your javascript, and if it's error 500, check the files located at:
var/log/system.log
var/log/exception.log
/var/log/apache2/error.log (si usas apache)
/var/log/nginx/nginx_error.log (si usas nginx)
I hope that this guide has been useful to create a basic webservice in Magento2. If you want to download the code used in this guide, visit the following link:
Creating a web service in Magento 2 gives development teams the flexibility to tailor integrations to their specific use cases. By defining clear endpoints and leveraging the Magento framework, companies can build stable connections to external systems, facilitating real-time data flow and improving operational processes.
Implementing a custom API also supports scalability, allowing for future extensions without the need to modify the code base. Together with Magento's authentication layers and access controls, web services become secure and effective tools for managing multichannel eCommerce environments.
In short, learning how to build a web service in Magento 2 opens the door to greater automation, integration and customization. It enables businesses to create smarter, more connected ecosystems that drive efficiency and support sustainable growth.


Let's find out how B2B platforms are becoming more important every day and also let's understand what are these platforms used for and how do they...

For many years, the checkout process in e-commerce applications (particularly the shipping address) was relatively rudimentary, emphasizing the...

Magento is a powerful and flexible e-commerce platform with a wide variety of SEO tools to ensure that the website ranks high in search engines.


